How to Install Headbox Roller Blinds
-
On your marks, get set… Go! Your headbox roller blind has arrived and now all that’s left is to install it!
It’s really straightforward and it will be up in your window in no time, just follow these easy steps!Step 1
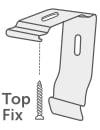
Our brackets can either be fitted top fix (to the top of the recess or to the ceiling), or face fix (on to a wall), so decide on which way these brackets will be fitted before you start drilling holes.
The brackets need to be fitted 50mm in from the ends of the blind. If your blind is particularly large you will have additional brackets which should be placed evenly along the width of the blind to support the weight.
Mark with a pencil where the brackets are to be fixed and then drill the holes.
Once the hole has been drilled, insert a wall plug and screw the brackets firmly in place.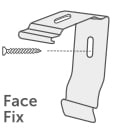
Step 2
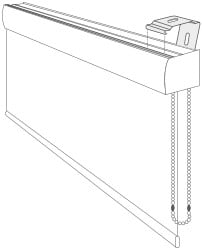
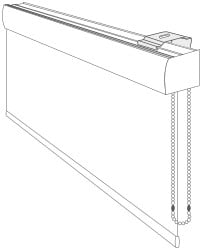
To attach the blind, hook the front ridge of the headrail into the front of the top clip. Push the cassette up until the back ridge slides in and clips into the back of the top clip, snapping the headrail into place. At this point you should also remove the transit clip in the mechanism. This is to stop the mechanism moving whilst your blind is being shipped to you, so this clip can be discarded once removed.
Step 3
Fit the child safety device by putting the chain through the hook, positioning the device in a position that ensures the chain is under tension but not strained (as this will cause damage to the chain). The chain should end 1500mm above the floor to ensure it is out of reach of children. Mark where the hole needs to drilled and then drill the hole, insert the wall plug and screw into place.
