How to Install Roller Blinds
-
You overcame the measurement minefield and now you must face the final challenge – installing your roller blind. Honestly, it isn’t half as bad as you think it is, and with this very easy guide, you’ll be done in no time. Grab a cuppa and have a quick read through our instructions to familiarise yourself before you get started. The tools you’ll need are: drill with 5mm drill bit, tape measure and a screw driver along with screws and suitable fixings (masonary/plasterboard) Screws and fixings are not supplied with our products.
Step 1 - Fitting the Brackets
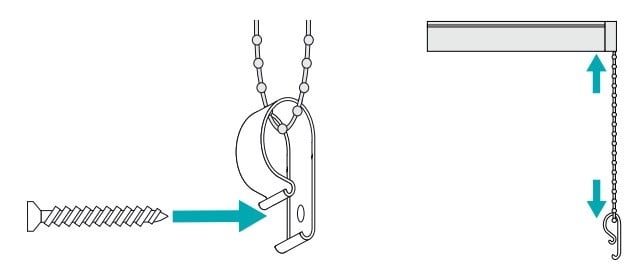
Before you begin match the brackets up to the blind. You’ll notice one end has a circle and the other has a cross shaped opening. The control end goes into the cross shaped bracket and the pin-end goes into the circle. Doing this will ensure you don’t fit the blind back to front.
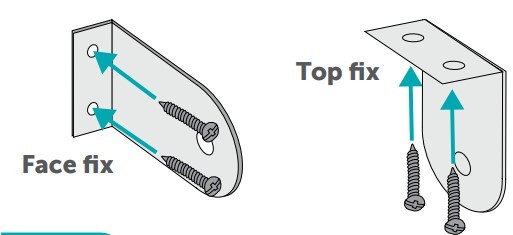
Place your first bracket in the position you wish to fit the blind to. Ensure your blind won’t get in the way of any handles or vents and adjust the positioning of the bracket to accommodate this. Measure the distance from the window to the bracket and mark the spot you need to drill, and repeat this on the other side, ensuring the brackets are level (a spirit level can help gauge this). Drill the hole, starting with a smaller pilot hole and then going to the wider 5mm drill bit. You should use a thin wood drill bit if attaching it to the window frame and consider using the smaller screws.
If you are fitting the blind to the wall, use a masonry drill bit with the wall plugs supplied (make sure the drill bit and the wall plugs are the same size). The alternative way of installing your blind is to attach these brackets to the ceiling or top of the recess with the blind hanging below, which is known as top fix. Again, drill a pilot hole first before using the wider drill bit and relevant wall plugs.
Important Note: Ensure there is enough space at the pin-end bracket (the end opposite the mechanism) to allow for free movement of the barrel. The pin-end of the blind is sprung to allow for easy removal of the blind and should not be fully compressed as this can cause the barrel to rub on the bracket and make operation stiff. This can result in the blind being hard to operate and for the chain to break.
Step 2 - Fitting Blind and Optional Bracket Covers
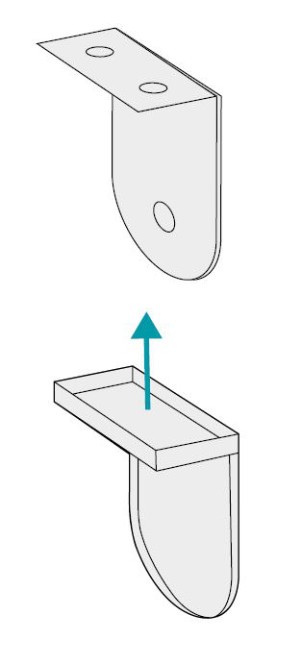
Once the brackets are up you can add the bracket covers if you ordered them. These optional extras will simply slide onto the brackets, giving your blind a professional and clean finishing touch if outside of the recess. The bracket covers are designed to have a nice tight fit, if you ever need to remove them insert a flat screwdriver into the cutout at the bottom inside of the cover and twist, this will release the cover.
Note: If you wish to use bracket covers on a blind going into the recess, be sure to account for the size of the cover before screwing in the brackets as it might be a tight fit.
Now it is time to fit the blind. First, attach the end opposite the controls (known as the pin-end), push gently against the pin-end to suppress the pin, lift the control end up and attach to the control end bracket.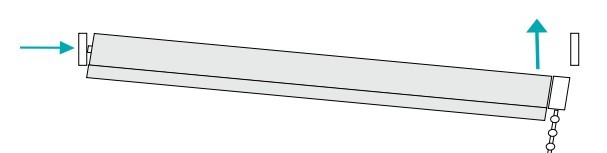
Child Safety Devices
Finally, attach the relevant child safety devices. The cord retainer should be at the maximum distance possible from the control mechanism, keeping the chain taut (but free enough to operate the blind smoothly). Put the retaining device on the wall, mark the hole with a pencil, drill the hole, insert a wall plug and screw the device to the wall. And there you go – your blind is safely up, so all that’s left is to give it a quick test.
Changing the Roll
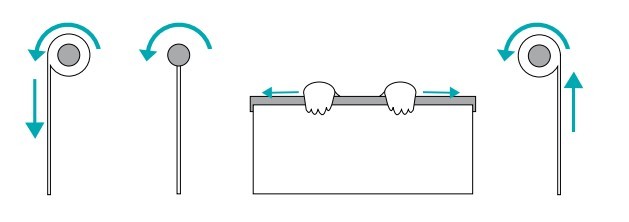
If you wish to change the way the blind is rolled, which is sometimes a good idea if you are trying to avoid window handles or other protruding objects, then simply unravel the blind all the way to the metal barrel and then re-roll it in the direction you want.
Note : Make sure your hands are clean, you wouldn’t want to mark you nice new shiny blind! It’s also a good idea to have your hands at equally lengths to ensure that when you re-roll the blind the roll is even, this will prevent any gather at one end and exposed barrel at the other.