How To Install Roman Blinds
Rome wasn’t built in a day but we reckon you can install a Roman blind in ten minutes. It’s easy to do and suited to nearly any DIY skill level. Once you open the box, you’ll find brackets, screws and fixings and your blind enclosed. The brackets will go up first and then the blind will pop into the brackets. Follow these steps and let us show you the way!
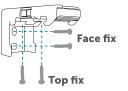
Step 1
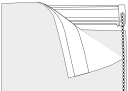
The brackets need to go as close to the end of the headrail as you can get them without getting in the way of the control mechanism. Measure where they need to be on the headrail and then use this measurement at the window. Ensure the brackets will be installed level, and that the blind will not get in the way of window handles.
Step 2
Use a pencil to mark where you will need to drill holes to fix the brackets. Note: If the blind is long, you may need to install more brackets along the length using the same method above.
Step 3
Use the appropriate raw plugs where necessary the ensure the brackets are secured. Your brackets are up, now’s the easy part!
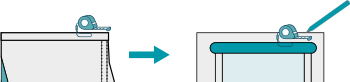
Step 4
Gently peel back the fabric back from the Velcro on the headrail exposing the metal. This makes things clearer to work with and you won’t get the fabric caught up in the bracket.
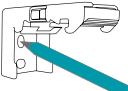
Step 5
Push the headrail into the bracket and make sure the plastic barb hooks into the rail, locking it into place. Repeat on all brackets.
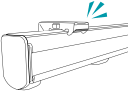
Step 6
Reattach the fabric making sure it covers up the brackets.
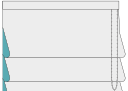
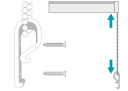
Step 7
The only thing left to do is to install your chain safety device. Keeping the chain taut with the device attached (but not too tight or you won’t be able to operate the blind), attach the safety device to the wall in a similar fashion to how you fixed the brackets (this may include using raw plugs).