Installing an XL Mains Electric Blinds
-
How to XL Mains Electric Blinds
Step 1
For our wider blinds, you'll find that the brackets are the same for both sides, and this is to ensure functionality whilst the blind is in situ.
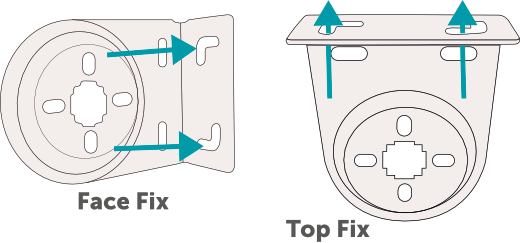
Place your first bracket into position, ensuring your blind won't get in the way of any handles or vents. The brackets can be top fixed or face fixed.
Measure the distance from the window to the bracket and mark the spot you need to drill and repeat this on the other side, ensuring the brackets are level (a spirit level can help gauge this).
Drill the hole, starting with a smaller pilot hole and then going to the wider 5mm drill bit. You should use a thin wood drill bit if attaching it to the window frame and consider using the smaller screws supplied. If you are fitting the blind to the wall, use a masonry drill bit with the wall plugs provided (make sure the drill bit and the wall plugs are the same size).
Important Note: Ensure there is enough space at the pin-end bracket (the end opposite the mechanism) to allow for free movement of the barrel. The pin-end of the blind is sprung to allow for easy removal of the blind and should not be fully compressed as this can cause the barrel to rub on the bracket and make operation stiff.
Step 2

Once the brackets are up you can add the bracket covers if you ordered them. These optional extras will simply slide onto the brackets, giving your blind a professional and clean finishing touch if outside of the recess. The bracket covers are designed to have a nice tight fit, if you ever need to remove them insert a flat screwdriver into the cutout at the bottom inside of the cover and twist, this will release the cover.
Note: If you wish to use bracket covers on a blind going into the recess, be sure to account for the size of the cover before screwing in the brackets as it might be a tight fit.
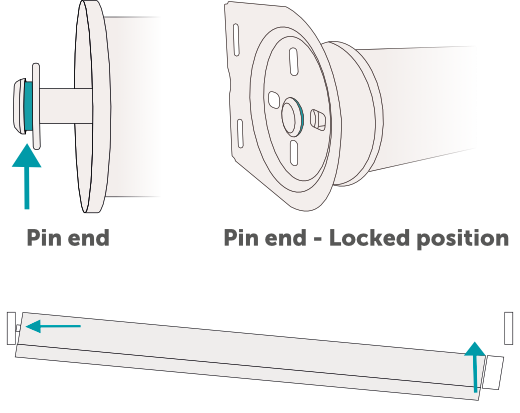
Now it is time to fit the blind. First, attach the end opposite the controls (known as the pin-end), push gently against the pin-end to suppress the pin, lift the control end up and attach to the control end bracket. Allow the blind to drop into its locked position. The bracket needs to sit between the two collars, on the part coloured blue in the illustration. Once locked in place, the blind will need to be pushed up first if it is to be removed and then pushed towards the pin end for the spring to compress, allowing you to pull the mechanism end out.
Changing the Roll
If you wish to change the way the blind is rolled, which is sometimes a good idea if you are trying to avoid window handles or other protruding objects, then simply unravel the blind all the way to the metal barrel and then re-roll it in the direction you want. Note: Make sure your hands are clean, you wouldn’t want to mark you nice new shiny blind! It’s also a good idea to have your hands at equal lengths to ensure that when you re-roll the blind the roll is even, this will prevent any gather at one end and exposed barrel at the other.

Step 3 ** IMPORTANT **
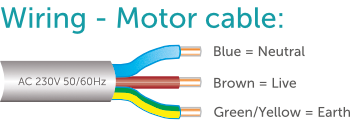
Your XL Mains Electric blind is supplied with a 2m power cable running from the blind and should be installed to the mains supply by a fully qualified electrician.
The blind is supplied without a UK 3-Pin Plug.How to programme your XL Mains Electric Roller Blind
The aim of the game here is to get your remote control talking to your blind so that you can recline in shaded bliss, controlling your blind with the touch of a button. To get there you need to follow these simple steps.
Programming
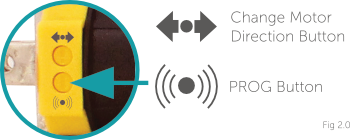
First thing we need to do is pair the controller to the motor, think of it like connecting a bluetooth device to your phone (only it’s not bluetooth and it’s easier!) On the motor, insert a small screwdriver into the hole marked (see fig 2) the prog button is located at the control end of the blind, (where the mains cable comes out and the small anterior is located, press and hold for one second. This is the ‘PROG’ button. The motor will shunt once. On the remote, press the ‘Up’ button and the motor will shunt again.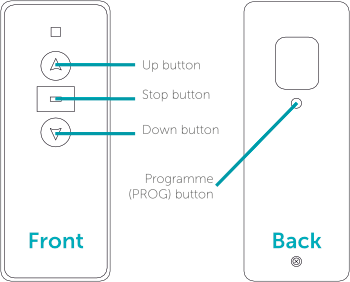
Changing the direction of travel
Now, depending on how the blind was installed, the motor’s world can become a bit topsy-turvy. Up means down, down means up, leaving you scratching your head in confusion. Don’t worry, it’s easy to fix. This step lets you tell the blind which direction you want it to move in when you press the relevant buttons on the remote.
Press and hold the “STOP” button on the transmitter for five seconds. The motor will shunt once. Press the ‘Down’ button and the motor will shunt again. Everything has been restored to its rightful place.Limit positions
The remote is speaking with the motor, the motor knows which way is up and which way is down, so now you need to tell it where the top and bottom of the window is.
Using the thin screwdriver, press the “PROG” button on the back of the remote, holding it for one second. The motor will shunt once.
Now you need to adjust the blind to the spot where you want it to stop every time the blind rises by using the up and down buttons. Once it is in place, press the “PROG” button on the back of the remote for one second, saving the limit stop.
To set the bottom limit stop, press the down button until it is in place, press and hold the “PROG” button for one second and the motor will shunt. Press and hold the “PROG” button again for one second and it will shunt again, indicating the bottom limit stop is set.Stop points in between
This is the exciting part, the reason you opted for an electric blind in the first place. With the top and bottom limits set, you can add up to four more stop points in between, so that the blind will stop at various heights.
To do this, adjust the blind to the spot where you want it to stop every time the blind rises or lowers by using the up and down buttons. Once it is in place, press the “PROG” button on the back of the remote, the motor will shunt one. Press the same “PROG” button again and the motor will shunt once more saving the limit stop.
The motor can store a maximum of six stops, with the furthest two called the UP and DOWN limit stops. The stops in between are called stop points. You can’t set stop points outside of the limit stops. You are able to finer tune the stop points’ positioning, or delete individual stop points separately. Pressing the Up or Down button twice within one second on the remote will instruct the motor to go to the top or bottom without stopping at the middle stop points.Delete Stop Points
Run the motor to the stop point you wish to delete. Press the “PROG” button on the back of the remote for seven seconds. The motor will shunt once and within seven seconds it will shunt again, indicating that the stop point has been cleared.Deleting All Limit and Stop Points
By deleting all of the memories stored in the motor, you will be reverting it back to factory settings.
Method 1 : Press the ‘Stop’ button for five seconds. The motor will shunt once. Press and hold the “PROG” button on the back of the remote for seven seconds and the motor will shunt again. The motor will shunt twice once more, indicating that the memory has been cleared.
Method 2 : Press the “PROG” button on the motor for 7 seconds. The motor will first shunt once and then again after 7 seconds indicating the memory has been cleared.And there you have it: you’ve programmed your DotcomBlinds blind and you’re all set to enjoy your blind in electrical bliss.
‘Why do I have to do this?’
‘Can't you have done it for me when you made my blind?’
Good point and the short answer is yes! However, knowing where you want to set your stops is a completely personal thing and if we did it for you then it could cause you frustration when installing and operating the blind and you'd end up performing a factory reset and doing it yourself! Instead we test every motor and controller and then in the final stage of testing, we reset them. This means we have peace of mind knowing that all's good and you'll be able to set it up the way you want.