Installing a Cord Drawn Curtain Track
-
Installing a Cord Drawn Curtain Track couldn’t be easier – we’ve done all the hard work in the manufacturing process, so all you have to do is unbox the track and follow these simple instructions!
Step 1
The first thing you need to install is the brackets to the wall. The brackets should be 100mm in from the end of the window track and spaced at no more than 600mm apart. Your track will come with the necessary number of brackets based on its length. Use pan head screws and use a washer if possible.

Step 2
Push the track onto the brackets, by putting the lug on the front of the bracket into the groove on the back of the track. If top fixing, hold the track in place whilst you drill and attach the brackets. For face fixing, hold the track in place and mark where you will need to drill for the brackets. Drill the holes, and attach the brackets and then attach the track.

-
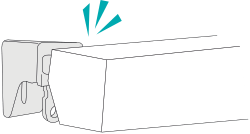
Step 3
Lift the track into place and put the lip of the lug on the front of the bracket into the top of the groove in the back of the track. When attaching make sure the locator is pointing downwards. Once the track is attached, push and turn the locator to the side so that it sits flush with the track and secures the track onto the brackets.

Step 4
Once the track is up, put the cord tidy at the bottom loop of the cord so that you know where to attach it to the wall. Take it off of the cord and screw in the back plate of the cord tidy to the wall. Add the central roller and cord and then hold it all in place with a screw though the front plate and the central roller.
