Installing an Electric Roller Blind
-
You overcame the measurement minefield and now you must face the final challenge – installing your electric remote control operated roller blind. Firstly, you need to remember how you measured for your blind. This affects where you attach the brackets.
Step 1
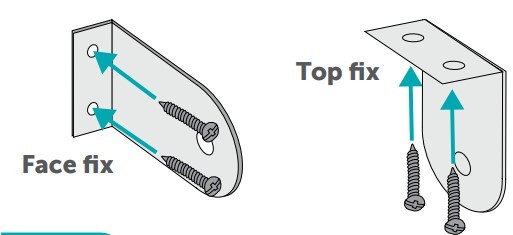
You’ll come across two ways of attaching your blind’s brackets: either attach them to the wall or window frame (depending on how you measured your blind in the first place). This is called face fix. To attach this, you should use a thin wood drill bit if attaching it to the window frame, or if it is going on to the wall, use a masonry drill bit with wall plugs (make sure the drill bit and the wall plugs are the same size). The alternative way of installing your blind is to attach these brackets to the ceiling or top of the recess with the blind hanging below, which is known as top fix.
Step 2
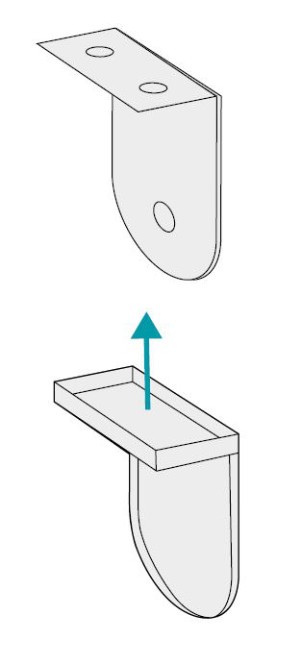
Once the brackets are up you can add the bracket covers. These will simply slide onto the brackets, giving your blind a professional and clean finishing touch if outside of the recess.
Now it is time to attach the blind. First, attach the end opposite the controls, and then attach the control end.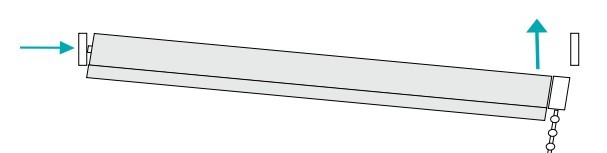
Your blind will come with some charge in the battery, which will be enough to programme the blind with, but we recommend plugging in the charger and letting it top up the battery before you use it fully.

Programming your blind is simple. Once your blind has been installed, you will need to get the remote control and the motor to talk to each other, let the motor know where the top and bottom of the blind is, and set stop positions in between (optional). Your battery in the blind will come with some charge in it from the factory, but it typically takes four hours to fully charge the battery so put your feet up for a while to let it charge up some more.
 Step 1
First thing we need to do is pair the controller to the motor, think of it like connecting a bluetooth device to your phone (only it's not bluetooth and it's easier!)
Using a small, thin Phillips screwdriver or pin, press the “Prog” button on the motor and it will beep. This is located at the end of the blind near the wire, on the bottom, within a tiny hole (to avoid it being mistakenly pressed whilst in operation). Press and hold the “Prog” button for one second and the blind will beep, this has taken the blind out of sleep mode, press the "Prog" button again for one second and the blind will shunt once (a sort of judder!), the shunt tells you that the motor is now in program mode.On the remote control press the ‘Up’ button, and the motor will shunt once again. You have successfully paired the remote to your blind.
Step 2Now that you have a paired controller and you’ve woken up the motor, it’s time to take that bad boy out for its first test run! Test that the blind is rolling in the correct direction by pressing the down button. Did the blind start to unroll? If it did then excellent your blind knows up from down! Skip the rest of this step and go straight to Step 3. If the blind starts to go up when you press the down button on the remote then it's inverted and we just need to switch it round (which is a piece of cake)!
Press and hold the ‘Stop’ button in the centre of the remote for five seconds, and the motor will shunt once. Now, press the ‘Down’ button and the motor will shunt again. There you go – ‘Up’ is up and ‘Down’ is… well, you get the gist.
 Step 3
This is the step where you tell the blind where the top and bottom of the window is, and therefore where it needs to stop every time you want it to open or close. This is called a ‘Stop Position’.
Press and hold the ‘Prog’ button on the reverse of the remote for one second. The motor will shunt once. The first ‘Stop Position’ you are going to set is the top, so press the ‘Up’ and ‘Down’ button on the remote until the blind is in the spot where you would like it to stop when it is open. Once you’re happy with where it is, press and hold ‘Prog’ on the reverse of the remote for one second to save the ‘Top Stop Position’. If there is no action from you within 30 seconds the motor will exit the ‘Stop Position’ preparation mode automatically.
Step 4Now we’re cooking with gas! Look at you go, setting up your ‘Stop Positions’. Now, you need to repeat Step 3 to tell the blind where to stop at the bottom of the window, and then set them for any ‘Stop Positions’ you’d like in between. Maybe a half-open-half-closed setting for those moments of indecisiveness, or perhaps a low ‘Stop Position’ to block the sun from blinding you at five in the afternoon. You have up to four more Stop Positions between the top and bottom to enjoy, so what are you waiting for?! Setting additional intermediate stops isn't a must, it's completely a "personal thing", but you must have a top and bottom stop set.
Step 5We know what it can be like – you live with your ‘Stop Positions’ for a week and decide that actually, you didn’t quite get it to stop in the right place. No worries – here’s the quick fix for fine tuning your ‘Stop Position.’
Let the motor run to the ‘Stop Position’ that you want to fine tune. Press and hold the ‘Prog’ button on the reverse of the remote for one second, until the motor shunts. Within seven seconds the motor will shunt again, indicating that the ‘Stop Position’ has been cleared and you’re free to set your new ‘Stop Position.’ This is only applicable to the intermediate stops, if you ever want to reset the top and bottom stops you'll need to perform a factory reset as shown in Step 5.
Step 6This step is pretty final, so unless you want to reset the motor to the factory settings, don’t do this!
Press and hold the ‘Prog’ button on the motor for seven seconds and the motor will beep once and shunt. When the motor beeps again after seven seconds, the memory has been cleared.
Alternatively, you can reset the motor this way: Press and hold the ‘Stop’ button on the remote for five seconds, until the motor shunts once. Press and hold the ‘Prog’ button on the reverse of the remote for seven seconds, within 10 seconds of pressing the ‘Stop’ button. The motor will shunt once. After seven seconds, the motor will shunt twice, indicating that the memory has been cleared.
And there you have it: you’ve programmed your DotcomBlinds blind and you’re all set to enjoy your blind in electrical bliss.
‘Why do I have to do this?’
‘Can't you have done it for me when you made my blind?’
Good point and the short answer is yes! However, knowing where you want to set your stops is a completely personal thing and if we did it for you then it could cause you frustration when installing and operating the blind and you'd end up performing a factory reset and doing it yourself! Instead we test every motor and controller and then in the final stage of testing, we reset them. This means we have peace of mind knowing that all's good and you'll be able to set it up the way you want.Changing the Roll
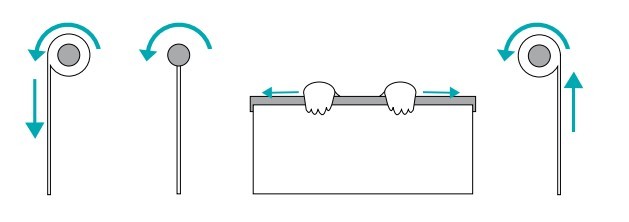
If you wish to change the way the electric blind is rolled, which is sometimes a good idea if you are trying to avoid window handles or other protruding objects, then simply unravel the blind and then re-roll it in the direction you want.
 Handy Tips:
When pressing the prog button on the rear of the remote ensure that you are using something small enough to depress the button in the hole. A small screwdriver or cocktail stick is usually ideal. Something such as a biro pen may be too big to reach the button to depress.
If installing multiple battery operated blinds ensure that you work on one blind at a time. The blinds will stay active for a short period after each use. If you are setting up multiple blinds you might be setting up the next blind with the first one still active.
To resolve this either wait approx. 15-20 minutes (to be safe) for the motor to go into hibernation mode or force the motor into a power down/hibernation status. To turn the motor off press the prog button on the motor for 7 seconds, the motor will beep and shunt one it will then beep again after 7 seconds. (Make sure not to wake the blind up by testing to see if it's turned off!).